Thursday, August 24, 2017

Using Google Team Drives to Create and Share Lesson Plans


With Google's release of Team Drives this last year, the process of creating and sharing lesson plans suddenly got a whole lot easier.

With a Team Drive, teachers don't have to wonder if they've shared their lesson plan folder with the right administrators or if the view/edit permissions are set correctly: everyone who has access to the Team Drive can see and provide feedback on their plans.

And to further improve the lesson planning workflow, you can submit a Docs lesson plan template for your organization to use. This helps teachers get to the work of lesson planning more quickly by starting with a pre-formatted document.

Below are the directions for how I set up several of the schools I support to use lesson plan templates in Team Drives. First we created a Team Drive, then we set up a reusable district lesson plan template. The final set of directions shows teachers how to use the template to quickly create new lesson plans.

(If you'd like my training resources, here's the step-by-step handout and video that shows teachers how to create lesson plans using their campus Team Drive.)

Creating a Team Drive
  1. Go to your Google Drive and click on "Team Drives" on the left-hand side.


  2. Click the "New" button in the top left-hand corner and name your Team Drive.


  3. Select "+ Add Members" and enter the email addresses of the people you want to have access to the Team Drive.

You'll have to decide what you want your folder structure to look like in the Team Drive. We make folders by grade level, then create a folder for each teacher to create their lesson plan in.


Creating the Lesson Plan Template

  1. Create a Google Doc with the lesson plan template for your campus.


  2. Go to docs.google.com and click on "Template Gallery."


  3. Select the name of your organization and click "Submit Template." Choose the Doc with your lesson plan template and click "Submit."

Depending on the settings for your district, you may have to wait for your template to be approved by your GSuite administrator. If there isn't an option to submit a template, you can talk to your GSuite Admin. If they're not familiar with templates, show them the screenshot below. The settings to allow custom templates are in the Admin Console under Apps > G Suite > Settings for Drive and Docs > Templates.


Creating a Lesson Plan from a Template
  1. Go to your Team Drive and select the correct folder.


  2. Click "New," then hover over the arrow next to Google Docs. Select "From a template."


  3. Select the name of your district, then click on the correct lesson plan template.


  4. Rename the template, then create your lesson plan. Since it's a Doc, everything saves automatically.

Tuesday, August 15, 2017

6 Tips for Managing a Technology-Rich Classroom

This is a simple, one-page handout with 6 tips for managing a technology-rich classroom. Perfect for training or coaching, the 6 tips are:
  1. Practice your routines for distributing devices
  2. Always use the same language to ask students for their attention
  3. Actively monitor
  4. Provide accountability
  5. Teach digital citizenship
  6. Rethink your lesson
The final tip references "A, B, & the 5Cs." These are our district's purposes for using technology: assessment, blended learning, collaboration, communication, creativity, critical thinking, and citizenship.

Get your editable Google Docs copy here


Icons made by Freepik from www.flaticon.com is licensed by CC 3.0 BY

Tuesday, August 8, 2017

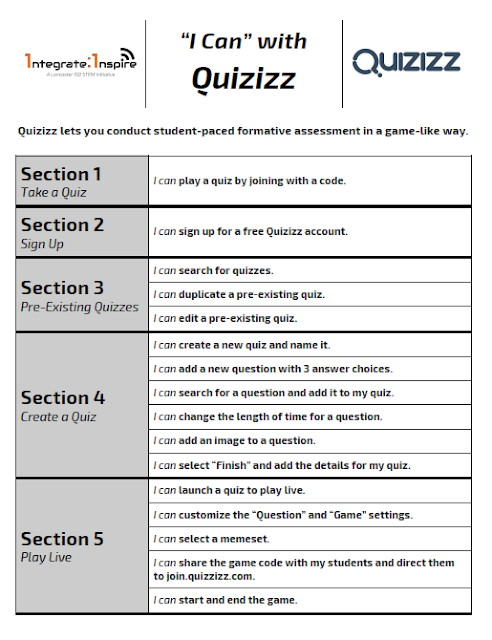
Quizizz "I Can" Statements for Teacher Training


In a recent post (like, two hours ago), I said that I'm trying out "I Can" statements for training teachers during this hectic back-to-school time for a variety of reasons.

You can see the "I Can" statements I created for my Flipgrid training here. This post has my Quizizz "I Can" statements to help teachers familiarize themselves with this fantastic formative assessment tool.

You can get your own editable copy of the Quizzizz "I Can" statements here. Happy training!


Flipgrid "I Can" Statements for Teacher Training


I'm trying something different (different for me, anyway) this week for back to school training: "I Can" statements.

"I Can" statements are common in the classroom to help students track their own progress toward an objective, but I think they're pretty useful for teachers, too. For my Flipgrid training, these statements are a one-pager with the most common tasks teachers need to know how to do when using Flipgrid.

My plan is to have teachers respond to a topic on a grid first so they get the student experience, then give them some unstructured time to explore Flipgrid by going through the "I Can" statements. By the end, they'll have created their first grid/topic and be ready to use it with students when the year starts.

Since everyone works at a different pace, I'm always a fan of giving my less tech-savvy teachers control over their pace so they don't feel rushed, while not holding back my gung-ho early adopters.

You can get your own editable copy of the "I Can" statements here if you want to try them out. Please leave some feedback on how they worked for you and your teachers so I can improve them. Thanks!

(Update: I also created Quizizz "I Can" statements that you can get here.)


Thursday, August 3, 2017

PixiClip + Google Classroom = Demonstrating Student Thinking


As a former math teacher, I'm always interested in hearing students explain the thinking behind their answer. But since my classroom had exactly one of me and a bunch of them, individual face time wasn't always possible.

I wish I'd had PixiClip.

PixiClip is a free online whiteboard that lets students show their work, record their voice, and submit their recording in Google Classroom with just a link. It doesn't require an account, and it works great on Chromebooks (especially the touch screen variety).

Here's how to use PixiClip and Google Classroom to let students to explain their thinking.
  1. Create an assignment in Google Classroom with a link to PixiClip. Students open the assignment and follow the link.


  2. There are drawing tools on the left, including the ability to upload images.


  3. Select "Add Audio Message" and allow PixiClip to access the microphone. Click "Record" and start drawing and speaking.


  4. When finished, click "Publish & Share," name your PixiClip, then click "Save." PixiClip will automatically show a preview.


  5. Copy the link at the top of the PixiClip preview and return to the assignment in Google Classroom. Select "Add Link," paste the link to your PixiClip, and select "Add Link." Select "Turn In" twice.


After students turn in their work in Classroom, all you have to do is open the assignment and click on their links. It will open their recording in a new tab, so you can quickly watch their PixiClip, then use "Ctrl + W" to close the tab and return to Classroom.
When you can't get to every student, PixiClip is the next best thing to let them explain the thinking behind their answer.