Thursday, August 24, 2017

Using Google Team Drives to Create and Share Lesson Plans


With Google's release of Team Drives this last year, the process of creating and sharing lesson plans suddenly got a whole lot easier.

With a Team Drive, teachers don't have to wonder if they've shared their lesson plan folder with the right administrators or if the view/edit permissions are set correctly: everyone who has access to the Team Drive can see and provide feedback on their plans.

And to further improve the lesson planning workflow, you can submit a Docs lesson plan template for your organization to use. This helps teachers get to the work of lesson planning more quickly by starting with a pre-formatted document.

Below are the directions for how I set up several of the schools I support to use lesson plan templates in Team Drives. First we created a Team Drive, then we set up a reusable district lesson plan template. The final set of directions shows teachers how to use the template to quickly create new lesson plans.

(If you'd like my training resources, here's the step-by-step handout and video that shows teachers how to create lesson plans using their campus Team Drive.)

Creating a Team Drive
  1. Go to your Google Drive and click on "Team Drives" on the left-hand side.


  2. Click the "New" button in the top left-hand corner and name your Team Drive.


  3. Select "+ Add Members" and enter the email addresses of the people you want to have access to the Team Drive.

You'll have to decide what you want your folder structure to look like in the Team Drive. We make folders by grade level, then create a folder for each teacher to create their lesson plan in.


Creating the Lesson Plan Template

  1. Create a Google Doc with the lesson plan template for your campus.


  2. Go to docs.google.com and click on "Template Gallery."


  3. Select the name of your organization and click "Submit Template." Choose the Doc with your lesson plan template and click "Submit."

Depending on the settings for your district, you may have to wait for your template to be approved by your GSuite administrator. If there isn't an option to submit a template, you can talk to your GSuite Admin. If they're not familiar with templates, show them the screenshot below. The settings to allow custom templates are in the Admin Console under Apps > G Suite > Settings for Drive and Docs > Templates.


Creating a Lesson Plan from a Template
  1. Go to your Team Drive and select the correct folder.


  2. Click "New," then hover over the arrow next to Google Docs. Select "From a template."


  3. Select the name of your district, then click on the correct lesson plan template.


  4. Rename the template, then create your lesson plan. Since it's a Doc, everything saves automatically.

Tuesday, August 15, 2017

6 Tips for Managing a Technology-Rich Classroom

This is a simple, one-page handout with 6 tips for managing a technology-rich classroom. Perfect for training or coaching, the 6 tips are:
  1. Practice your routines for distributing devices
  2. Always use the same language to ask students for their attention
  3. Actively monitor
  4. Provide accountability
  5. Teach digital citizenship
  6. Rethink your lesson
The final tip references "A, B, & the 5Cs." These are our district's purposes for using technology: assessment, blended learning, collaboration, communication, creativity, critical thinking, and citizenship.

Get your editable Google Docs copy here


Icons made by Freepik from www.flaticon.com is licensed by CC 3.0 BY

Tuesday, August 8, 2017

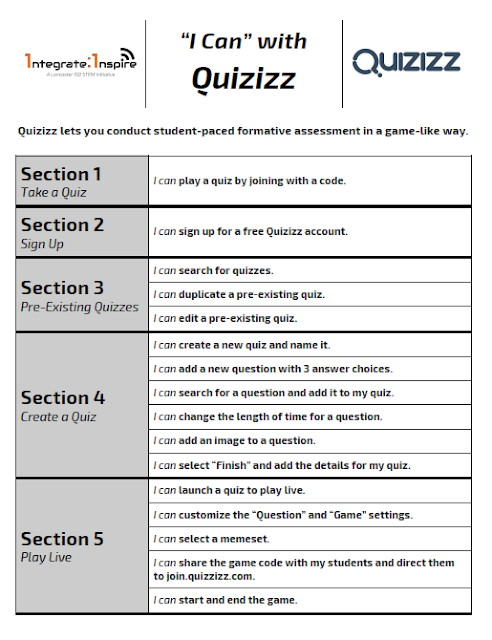
Quizizz "I Can" Statements for Teacher Training


In a recent post (like, two hours ago), I said that I'm trying out "I Can" statements for training teachers during this hectic back-to-school time for a variety of reasons.

You can see the "I Can" statements I created for my Flipgrid training here. This post has my Quizizz "I Can" statements to help teachers familiarize themselves with this fantastic formative assessment tool.

You can get your own editable copy of the Quizzizz "I Can" statements here. Happy training!


Flipgrid "I Can" Statements for Teacher Training


I'm trying something different (different for me, anyway) this week for back to school training: "I Can" statements.

"I Can" statements are common in the classroom to help students track their own progress toward an objective, but I think they're pretty useful for teachers, too. For my Flipgrid training, these statements are a one-pager with the most common tasks teachers need to know how to do when using Flipgrid.

My plan is to have teachers respond to a topic on a grid first so they get the student experience, then give them some unstructured time to explore Flipgrid by going through the "I Can" statements. By the end, they'll have created their first grid/topic and be ready to use it with students when the year starts.

Since everyone works at a different pace, I'm always a fan of giving my less tech-savvy teachers control over their pace so they don't feel rushed, while not holding back my gung-ho early adopters.

You can get your own editable copy of the "I Can" statements here if you want to try them out. Please leave some feedback on how they worked for you and your teachers so I can improve them. Thanks!

(Update: I also created Quizizz "I Can" statements that you can get here.)


Thursday, August 3, 2017

PixiClip + Google Classroom = Demonstrating Student Thinking


As a former math teacher, I'm always interested in hearing students explain the thinking behind their answer. But since my classroom had exactly one of me and a bunch of them, individual face time wasn't always possible.

I wish I'd had PixiClip.

PixiClip is a free online whiteboard that lets students show their work, record their voice, and submit their recording in Google Classroom with just a link. It doesn't require an account, and it works great on Chromebooks (especially the touch screen variety).

Here's how to use PixiClip and Google Classroom to let students to explain their thinking.
  1. Create an assignment in Google Classroom with a link to PixiClip. Students open the assignment and follow the link.


  2. There are drawing tools on the left, including the ability to upload images.


  3. Select "Add Audio Message" and allow PixiClip to access the microphone. Click "Record" and start drawing and speaking.


  4. When finished, click "Publish & Share," name your PixiClip, then click "Save." PixiClip will automatically show a preview.


  5. Copy the link at the top of the PixiClip preview and return to the assignment in Google Classroom. Select "Add Link," paste the link to your PixiClip, and select "Add Link." Select "Turn In" twice.


After students turn in their work in Classroom, all you have to do is open the assignment and click on their links. It will open their recording in a new tab, so you can quickly watch their PixiClip, then use "Ctrl + W" to close the tab and return to Classroom.
When you can't get to every student, PixiClip is the next best thing to let them explain the thinking behind their answer.  

Thursday, July 27, 2017

5 SeeSaw Stations for Training Teachers


SeeSaw is my favorite elementary app ever (for these 12 reasons). But no matter how much I talk about it, describe it, and recite poetry devoted to it in my trainings (not really...but maybe someday), sometimes a hesitant teacher just needs to experience SeeSaw to get what it's all about.

To help spread the SeeSaw love, here are five training stations primary teachers can rotate through and use SeeSaw like a student. The first four stations are aligned to Texas state standards (TEKS) for K-2nd, and the last station focuses on classroom rules and routines. Enjoy!

Get the Station Directions
Make a copy with Google Docs or download a PDF


Station 1 - Kindergarten Math


Teachers use the photo feature to go on a 3-D shape scavenger hunt looking for cylinders, cones, spheres, and cubes. They then use the voiceover and drawing feature to identify the figure they found.


Station 2 - 1st Grade ELAR/Reading


After reading "Cinderella," teachers identify the beginning, middle, and end of the story using this graphic organizer. Once they've written their response, they'll take turns recording each other retelling the story using SeeSaw's video feature.


Station 3 - 2nd Grade Science


Participants will complete a card sort and put the steps of a chicken's life cycle in the correct order. Then using SeeSaw's drawing tool, they'll create their own representation of a chicken's life cycle, narrating what happens in each step. 


Station 4 - 1st Grade Math


Using Base 10 blocks (printable), teachers model a number between 1 and 120. Then they use the hundreds chart to find patterns of "10 more/10 less." Finally, they record an explanation of the patterns they found on the hundreds chart using SeeSaw's video tool.


Station 5 - Classroom Expectations


Teachers choose a classroom rule, then create a short commercial to explain and demonstrate it to the class. 

Thursday, July 20, 2017

Seymour Papert vs. The "Teaching Machines"


There's a classic image in cartoons: the main character has a moral choice to make, and there's a little angel version of themselves on one side, and a little devil version on the other.

Who will they listen to? What will they do? Will they follow their better selves or concede to their darker natures?

Those of us in edtech (teachers, coaches, administrators, vendors) have a similar decision. Only for us, the consequences aren't as cartoonish as the possible flattening of the RoadRunner with an ACME brand anvil, and the characters whispering in our ears aren't haloed or horned.

On our right shoulder is Seymour Papert, on our left is B.F. Skinner and his "Teaching Machines."

Seymour Papert is the visionary behind the idea that the child should program the computer, the computer shouldn't program the child. To Papert, students should use technology to explore the world around them, create, play, and explore. (Papert's responsible for a whole lot more...check out Dr. Gary Stager's TEDx talk).

Photo Credit: shen-montpelier | wikimedia commons

B.F. Skinner's "Teaching Machines," on the other hand, were specifically created to program the child through behaviorist response/reward reinforcement. Students saw a sentence or an equation and wrote their answer in the blank space on the right. If they were correct, they moved on. If not, they were given carefully sequenced information in the smallest of steps to teach them the missing material.

Skinner saw his machines as being able to take over all the instruction in a classroom, which he envisioned becoming as "mechanized as the kitchen."

Photo Credit: silly rabbit | wikimedia commons

In my mind, "Papert vs. The Teaching Machines" is the choice that faces everyone involved in edtech, every single day. Are we going to take the time to develop Papert's rich learning experiences where students program, design, collaborate, inquire, discover, and create?

Or are we going to remand our students to call center cubicles, hand them their headphones, and outsource all our instruction to the 21st century version of Skinner's machines?


Just something to think about. 

Thursday, July 6, 2017

Using Garageband and Apple Loops to Remix History


How do we get students to interact with history?

Let them remix it. 

I was messing around with GarageBand on my new MacBook Pro a few days ago, and I started to explore Apple Loops, GarageBand's built-in loop library.

If you're not familiar with loops, they're repeating sections of sound patterns that you can drag-and-drop into GarageBand to create some really interesting instrumental tracks. The best part of using a loop library is that you don't have to have any formal training to create some killer sounding music.

GarageBand with Apple Loops

I started to think about how we could use this with students, and I wondered what it would be like to layer some spoken audio over the top of what I'd made.

Since presidential speeches are in the public domain, I found a 30-second clip of Harry S Truman addressing the nation after dropping the atomic bomb on Hiroshima

I downloaded it, brought it into GarageBand, and listened, thinking about how I could make it fit.

And something interesting happened.

I had to really listen to Truman's speech. Nuance, breaks, emphasis, inflection...they all became important because they all became part of the tapestry of sound I was creating. 

I'd never noticed the slightly unsettling glee in Truman's voice when, right after announcing the bomb had been dropped, he informs America that "We won the race of discovery against the Germans."

Hooray.

Or that part of the rationale of the attack was "to shorten the agony of war," a claim that with 70 years of hindsight and unintended consequences, seems completely and painfully absurd.

Here's what I put together, the speech starts about 30 seconds in. The kids can do way better. :)


I found it very interesting that by chopping, rearranging, repeating, trimming, and remixing, I was forced to interact with the speech (and the event) in a way I never would have by passively listening to it. 

So as you think about what historical figure or event your students will study next, ask yourself how they can remix it and make it their own. They'll blow you away with what they can do.

Thursday, June 29, 2017

4 Podcast Episodes to Expand Your Mind This Summer


Summer is a chance for educators to think about something different, expand our minds, and explore new ideas.

And if you're anything like me, some your best sparks of inspiration will come from taking in ideas outside of the edtech and education world. These concepts collide with what's already working inside your brain to create something new and beautiful.

Or maybe they'll just make you stop and think for a second.

In honor of exploring outside ideas, here are 4 great non-edtech, non-education podcast episodes you may want to give a listen to this summer. You just never know what you're going to find.

  1. Jason Friedman: Restoring Sanity to the Office (31:32)
    Harvard Business Review Ideacast 


    The HBR Ideacast talks to authors of articles that have been published in the Harvard Business Review. And honestly, some of them can be just a touch dry.

    This is not one of them.

    Jason Friedman is the CEO of Basecamp and also wrote one of my all-time favorite business books, Rework. He's a very straightforward writer, and this interview goes the same way.

    He takes on the insanity of our current office culture, the stupidity of status meetings, and the nuttiness of our excessively collaborative multi-tasking (all of which also applies to school culture) and gives some ideas on taking back your work environment so you can actually get some work done.

    Anyone who has ever worked anywhere will appreciate the simplicity of Jason's approach to creating a more sane culture of work.

  2. Disruptive Leadership (52:28)
    The TED Radio Hour


    The TED Radio Hour, hosted by Guy Raz, pieces together TED Talks that all share a common theme. In this episode, speakers and interviews include (among others) retired general Stanley McChrystal on learning from failure (and he did have one, if you don't remember), Facebook COO Sheryl Sandberg (also of Lean In fame) on cultivating female leaders, and Seth Godin on how ordinary people can find and lead their tribe.

    There's a great variety of perspectives in this episode, and I felt like I learned something from all five segments of the show.

  3. What to Make of Philando Castile's Death, One Year Later (21:59)
    Code Switch


    Code Switch is a team of seven NPR journalists who cover race, ethnicity, and culture, and they do so in a very honest, engaging way.

    This episode explores the landscape after the acquittal of Jeronimo Yanez, the police officer who fatally shot Philando Castile during a traffic stop in July 2016. A journalist who has followed the story since it happened and close-friend-turned-activist talk about their perspectives on the tragedy.

    Two takeaways: first, Castile had been pulled over 46 times since he was 19 years old, and only 6 of those were for offenses that could be observed from outside the vehicle (speeding, running a stop sign, etc.).

    Secondly, in the suburban area where Castile was pulled over, 50% of the arrests made are African-American, while African-Americans only make up 7% of the population.

    An eye-opening episode indeed.

  4. Virgin: Richard Branson (34:54)
    How I Built This


    I love stories about how entrepreneurs have built their companies. It reminds me that they were scared, uncertain, and unsure if their idea would work long before they became successful.

    This interview with Richard Branson reveals a very honest portrait of a very interesting guy who went from starting a magazine, which became a record store, which became a record label, to currently mining the possibility of commercial human spaceflight.

    Virgin now has over 250 lines of business worldwide, and Branson couldn't even tell you what all of them are. But he is a serial entrepreneur and a once-in-a-generation type of personality. Really a fascinating listen.
There are 4 episodes to get you started. Let me know what you think, and if you have a "must-listen" episode of your own, post it in the comments below.

Icons made by Madebyoliver from www.flaticon.com is licensed by CC 3.0 BY
Icons made by DinosoftLabs from www.flaticon.com is licensed by CC 3.0 BY

Tuesday, June 20, 2017

Using GSuite to Teach the Engineering Design Process (Part 3)


Part 1 - Engineering Habits of Mind and the Design Process
Part 2 - How GSuite Supports the Engineering Design Process
Part 3 - A Simple Design Challenge using GSuite (includes example GSuite docs)


A Simple Design Challenge Using GSuite


It's easiest to see how GSuite supports the Engineering Design Process by using an actual design challenge. Let's take the simple act of building and optimizing a paper airplane for the longest flight possible using only the materials provided. You can join my Google Classroom with all the example assignment files here. The class code is ss9zv2w.


Identify the Problem/Brainstorm/Design Selection - Google Docs


Students start by using Docs to clearly define the problem they're attempting to solve. In this challenge, a lot of students will leave out the constraint that they can only use the materials provided to them. It's important to push students to have a clear and detailed problem definition before they start designing.

Then, students work with their groups to brainstorm ideas they'd like to include in their design. As they do this, they're activating their prior knowledge and what they already know about airplane design before moving into research. After exhausting what they already know, students use the "Explore" feature in Docs to drag-and-drop images, websites, and other resources to help inspire their possible designs.

Finally, students work together to decide what aspects of their brainstorming they want to use in their prototype.


Build Prototypes - SketchUp


Prototypes can be built virtually or by hand. In the case of this challenge, it's probably not necessary to spend a lot of time in SketchUp, since paper airplanes can be prototyped pretty quickly. 

However, if you're interested in students doing some 3D modeling work, they can start with 3D Warehouse, which is Sketchup's 3D object repository. A simple search for "paper airplanes" will bring up several 3D models that students can rotate and explore.

If you'd like, groups can then work on their own designs in SketchUp, download the file (.skp), then upload it as an attachment in Google Classroom.


Test and Optimize Design - Google Sheets and Forms


Once plans are made and prototypes are built, it's time to test. Groups will launch their planes multiple times, make modifications between each throw, then track their data in a shared Google Sheet. This particular spreadsheet has a bit of conditional formatting to help them quickly see if their modifications improve their flight distance (or not).

After their first round of test flights, students will answer the questions in a short Google Form about what worked to improve their flight distance. In the Google Classroom I set up for this challenge, I gave all students access to the "Responses" spreadsheet so they can learn from the experiences of the groups around them.

Once they've reflected on their flight data and the Form responses, it's up to you and the time constraints of your classroom as to whether or not students will take another round of test flights to further optimize their airplane design.


Share the Solution - Google Slides


When all the testing is complete and each group is satisfied with their design, it's time to share. Groups will use a shared Slides presentation and add their flight distance data and reflections on their slide. They can capture images of their airplane using the "Insert > Image > Take a Snapshot" tool. 

After each group has their slide completed, it's easy to share their results with the class efficiently so everyone benefits from the experience. 


Wrap Up


At the end of the day, it will always be true that it's not about the tool, it's what you do with it. Using GSuite to support design thinking and the engineering design process encourages students to find multiple ways to solve a problem, test and optimize their designs, then share their results with those around them.

Because no matter what our students go on to do, that's a skill set every one of them will need for the future.

Part 1 | Part 2 | Part 3

Using GSuite to Teach the Engineering Design Process (Part 2)


Part 1 - Engineering Habits of Mind and the Design Process
Part 2 - How GSuite Supports the Engineering Design Process
Part 3 - A Simple Design Challenge using GSuite  (includes example GSuite docs)

How GSuite Supports the Engineering Design Process


As students confront complex problems, GSuite provides a great toolkit for working through the engineering design process. The animation below shows how Google tools can support each step.


You'll see all of these in action in part 3, so here's a quick overview of each tool and its role.


Google Docs


Docs is the perfect tool for problem identification, solution brainstorming, and design selection.
With the ability to collaborate with other members of their team, the use of the "Explore" feature to find endless ideas to spark creativity, and the comments feature to discuss final design selection, Docs becomes the central hub of the group's planning process.

Sketchup


Okay, so it's not technically a Google tool anymore (Google sold it to Trimble back in 2012...here's why if you're interested), but I still have a hard time not thinking of SketchUp and Google as being linked. Google used it for about 6 years to model buildings in Google Earth until they found a better way, then sold SketchUp and moved on. 

However, with the recently announced "SketchUp for Schools Beta," schools using GSuite for Education will have access to the web-based version of Sketchup for FREE. So yes, throw the penalty flag on the inclusion of this not-technically-Google tool, but the GSuite integration lets me slide it in here with only a mild prick of conscience. :) 

Sketchup is powerful 3D modeling software that lets student design models and prototypes quickly with a small learning curve. Couple that with a promise of 3D printing ability coming soon, and SketchUp becomes an amazing tool for rapid prototyping during the EDP.

Yes, you can even build dinosaurs with SketchUp


Google Sheets


When students test their design and then work to optimize it, they have to have data. Data tells them whether or not the modifications they've made to their design have improved it or made it worse. It becomes even more powerful they have access to the data set of the entire class, which lets them compare designs and share ideas as they optimize their own work. A shared class spreadsheet is the perfect way to gather everyone's data in one place for comparison and discussion.

Google Forms


Depending on the design and ultimate end user, part of the optimization process is user feedback. With Forms, groups can create quick surveys to get feedback from classmates, teachers, and industry professionals on how they can improve their design.

Google Slides


When all the brainstorming, building, testing, and optimizing is finished, it's time to share. The ability to insert images and video into Slides lets student communicate not only their end result, but also lessons learned throughout the design process. When presentation time comes, it's also pretty handy to have one class presentation that everyone has put their work in instead of countless separate ones.

With that general outline in mind, let's take a look at a simple engineering design challenge and how these Google tools support the process.

Part 1 | Part 2 | Part 3

Using GSuite to Teach the Engineering Design Process (Part 1)


I recently led a half-day training focused on how to use Google tools to support STEM activities in the classroom. Specifically, we explored the role of GSuite in the engineering design process and STEM design challenges. These posts capture the essence of that training, along with links to examples so you can modify them for use in your classroom.

Part 1 - Engineering Habits of Mind and the Design Process
Part 2 - How GSuite Supports the Engineering Design Process
Part 3 - A Simple Design Challenge using GSuite (includes example GSuite docs)

Engineering Habits of Mind


At the heart of STEM education is the idea that, no matter what content area we teach, we want our students to develop engineering habits of mind. According to the Royal Academy of Engineering, those six habits are:
  1. Systems thinking
  2. Adapting
  3. Problem finding
  4. Creative problem solving
  5. Visualizing
  6. Improving
Those particular skills aren't exactly nourished in our current test-crazed, convergent-thinking, multiple-choice school culture. The question, then, is how do we help students exercise these skills in the classroom and what digital tools can we use to support them?

The Engineering Design Process (EDP)


The Engineering Design Process (EDP) provides a framework to help students think through and solve complex problems. As more schools adopt STEM, there are ever more versions of the EDP available, so you can mix-and-match/pick-and-choose which one works best for your purposes. This Google image search for "engineering design process" should be more than enough to get you started. 

No matter what version of the EDP you choose, though, they all have the same basic elements, which align with the engineering habits of mind listed above.
  1. Identifying the problem
  2. Brainstorming solutions
  3. Generating/selecting a design or plan
  4. Building a model or prototype
  5. Testing and evaluating
  6. Optimizing
  7. Sharing
For the purposes of these posts, I'll use this one from the NASA Jet Propulsion Laboratory activity "The Sky and Dichotomous Key."

Image credit: NASA/JPL-Caltech

Part 1 | Part 2 | Part 3